Featured Post Today
print this page
Latest Post
Showing posts with label Sensor. Show all posts

Dark Activated Terrace Lamp Circuit

Description
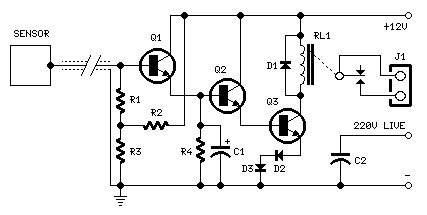
This device allows one or more lamps to illuminate at sunset and turn off at dawn.Q1 and Q2 form a trigger device for the SCR, providing short pulses at 100Hz frequency. Pulse duration is set by R2 and C1.When the light hits R1, the photo resistor assumes a very low resistance value, almost shorting C1 and preventing circuit operation. When R1 is in the dark, its resistance value becomes very high thus enabling circuit operation. 
Circuit Diagram:

Parts
  • R1 = LDR
  • R2 = 100K
  • R3 = 200K
  • R4 = 470R
  • R5 = 12K
  • R6 = 1K
  • R7 = 470R
  • C1 = 10nF-63V
  • D1 = TIC106D
  • D2 = 1N4007
  • D3 = 1N4007
  • D4 = 1N4007
  • D5 = 1N4007
  • Q1 = BD327
  • Q2 = BD337
  • SK1 = Female Mains Socket 
 Notes:
  • R3 allows fine setting of operating threshold and R2 value can be raised to 150K maximum.
  • Several lamps wired in parallel can be connected to the circuit, provided total power dissipation of the load does not exceed about 300 - 500W.
  • PL1 can be omitted and the input mains supply wires connected in parallel to any switch controlling lamps. In this case, if the switch is left open, the circuit will be able to drive the lamps; if the switch is closed, the lamps will illuminate and the circuit will be by-passed.
  • Warning! The circuit is connected to 230Vac mains, and then some parts in the circuit board are subjected to lethal potential! Avoid touching the circuit when plugged and enclose it in a plastic box. 
Source http://www.extremecircuits.net/2009/06/dark-activated-terrace-lamp_19.html
0 comments

Water Pump Relay Controller Circuit Schematic

Description
By means of a Relay, employed to drive a water pump, this circuit provides automatic level control of a water reservoir or well. The shorter steel rod is the "water high" sensor, whereas the longer is the "water low" sensor. When the water level is below both sensors, IC1C output (pin #10) is low; if the water becomes in contact with the longer sensor the output remains low until the shorter sensor is reached. At this point IC1C output goes high, Q1 conducts, the Relay is energized and the pump starts operating.
Now, the water level begins to decrease and the shorter sensor will be no longer in contact with the water, but IC1C output will be hold high by the signal return to pin #5 of IC1B, so the pump will continue its operation. But when the water level falls below the longer sensor, IC1C output goes low and the pump will stop. SW1 is optional and was added to provide reverse operation. Switching SW1 in order to connect R3 to pin #11 of IC1D, the pump will operate when the reservoir is nearly empty and will stop when the reservoir is full. In this case, the pump will be used to fill the reservoir and not to empty it as in the default operating mode.
Circuit Diagram:
Parts:
  • R1 = 15K - 1/4W Resistors
  • R2 = 15K - 1/4W Resistors
  • R3 = 10K - 1/4W Resistor
  • R4 = 1K - 1/4W Resistor
  • D1 = LED - any type and color
  • D2 = 1N4148 - 75V 150mA Diode
  • Q1 = BC337 - 45V 800mA NPN Transistor
  • IC1 = 4001 Quad 2 Input NOR Gate CMos IC
  • SW = SPDT Toggle or Slide Switch (Optional)
  • RL1 = Relay with SPDT 2A @ 230V switch
  • Coil Voltage 12V - Coil resistance 200-300 Ohm
  • Two steel rods of appropriate length 
Notes
  • The two steel rods must be supported by a small insulated (wooden or plastic) board.
  • The circuit can be used also with non-metal tanks, provided a third steel rod having about the same height of the tank will be added and connected to the circuit's negative ground. 
 Source http://www.extremecircuits.net/2010/01/water-pump-relay-controller-circuit.html
0 comments

On Off Touch Switch Circuit

Description 
 The modern mechanic switches are improved concerning of old technology. We need however many times to replacement some old switch or to check currents bigger than the durability of certain switches or simple we need something with modern appearance. For he and different reasons is essential the up circuit. It is simple in the manufacture and the materials that use they exist everywhere. 
Circuit Diagram:
Parts:
  • R1 = 3.3M
  • R2 = 3.3M
  • R3 = 10K
  • R4 = 1K
  • C1 = 10nF-63V
  • D1 = 1N4007
  • D2 = Red LED
  • Q1 = BC547
  • IC1 = NE555
  • RL1 = 12V Relay
Circuit Operation:
 This circuit is based on the well known timer IC 555 (IC1), which drives a relay of which the contacts play the role of switch. The metal surfaces can have what form we want, but it should they are clean and near in the circuit. In order to it changes situation it suffices touch soft somebody from the two plates. Plate MP1 in order to the contacts of RL1 close [ON], or plate MP2 in order to the contacts of RL1 open [OFF]. The current that RL1 will check depended from his contacts. The Led D2 turns on when the switch they are in place ON and the contacts of RL1 closed. Two small pieces of metal can be used instead of MP1 – MP2. Because MP = Metal Plate.


Source http://www.extremecircuits.net/2009/08/on-off-touch-switch-circuit.html
0 comments

Capacitive Sensor Circuit Schematic Diagram

Special design for shop-windows animation
Useful for many types of touch controls
Circuit diagram:
Parts:

R1,R2_____1M  1/4W Resistors
R3,R4____47K  1/4W Resistors

C1_______10µF  25V Electrolytic Capacitor
C2______470pF 630V Ceramic or Polyester Capacitor

D1-D3____1N4002 100V 1A Diodes

Q1-Q3_____BC337  45V 800mA NPN Transistors

RL1_______Relay with SPDT 2A @ 220V switch
          Coil Voltage 12V. Coil resistance 200-300 Ohm

J1________Two ways output socket

Sensor____Aluminium or copper thin sheet with the dimensions of a post-card,
          glued at the rear of the same (about 15x10.5 cm.)

Thin screened cable
Circuit Description: 
The purpose of this circuit is to animate shop-windows by means of a capacitive sensor placed behind a post-card-like banner. The card is placed against the glass inside the shop-window, and the visitor can activate the relay placing his hand on the card, from the outside. Especially suited for toy-shops, the circuit can activate model trains, small electric racing cars, lights etc. Further applications are left at user's imagination. Adopt it to increase the impact of your shop-window on next Christmas season!
Q1, Q2 & Q3 form a high impedance super-Darlington that drives the relay, amplifying the 50 or 60Hz alternate mains-supply frequency induced in the sensor by the human body. C1, D2 & D3 ensure a clean switching of the relay. Power supply can be any commercial wall plug-in transformer adapter with rectifier and smoothing capacitor, capable of supplying the voltage and current necessary to power the relay you intend to use.
Note: 
  • For proper operation, circuit ground must be connected via a small value, high voltage-rating capacitor to one side of the mains supply socket. The "Live" side is the right one.
Source - http://redcircuits.com/Page22.htm

0 comments

Electromagnetic Field Detector Circuit

Circuit diagram 
This lovely circuit is a real gem! Easy to assemble and more sensitive than many commercial devices available. It's based around an LF351 low-noise operational amplifier and a 1mF choke acting as the sensor. Unlike most other simple EMF detectors, this one has a meter output for accurate reading, but alternatively, you can also roughly estimate the frequency of the field by plugging in headphones. It can detect any field from 50Hz to 100kHz, making it highly versatile and a worthwhile addition to any hobbyist's workbench.
Problems:
 I just couldn't find any.
Possible uses:
 Find out how far electromagnetic fields extend in your room, house, office...
Are you a ghost hunter? Then this is the circuit that you've been waiting for! Since it has been observed that appearance of a ghost tends to disturb the EMF, you can now detect any such changes with this little detector.

Author: Andy Collins' Circuit Exchange
Source - http://www.zen22142.zen.co.uk/
1 comments

LED Photo Sensor Circuit Diagram

Description
Here's a circuit that takes advantage of the photo-voltaic voltage of an ordinary LED. The LED voltage is buffered by a junction FET transistor and then applied to the inverting input of an op-amp with a gain of about 20. This produces a change of about 5 volts at the output from darkness to bright light. The 100K potentiometer can be set so that the output is around 7 volts in darkness and falls to about 2 volts in bright light. 
Circuit Diagram

0 comments

1/4 wavelength Active Antenna Circuit Diagram

Circuit Diagram
Description
Antennas are much shorter than quarter wavelength impedance obtained is very small and highly dependent on the frequency. It was a difficult game impedances over a decade of frequency coverage. Instead, the phase of the input source-follower FET Q1. A high impedance input successfully bridges Antenna characteristics at any frequency.
 
transistor Q2 is used as a follower, to provide a high impedance load for Q1, but more importantly that it makes to drive low-impedance amplifier coupled to commonly Q3, which each receive a voltage amplifier. Q3 Q4 turns transistor output impedance is relatively low in impedance, which is enough to drive 50 Three dimensional receiver, Antenna input impedance.
0 comments

Clap Sensitive On-Off Relay

Description 
 This circuit was intended to activate a relay by means of a hand clap. Further claps will turn-off the relay. An interesting and unusual feature of this project is the 3V battery operation. The circuit's sensitivity was deliberately reduced, in order to avoid unpredictable operation. Therefore, a loud hand clap will be required to allow unfailing on-off switching. Q1 acts as an audio amplifier. IC1 timer, wired as a monostable, provides a clean output signal and a reasonable time delay in order to allow proper switching of the following bistable circuit. A discrete-components circuit formed by Q2, Q3 and related parts was used for this purpose, in order to drive the Relay directly and to allow 3V supply operation.
Circuit Diagram: 

Parts: 

  • R1 = 12K
  • R2 = 1M
  • R3 = 6.8K
  • R4 = 220K
  • R5 = 2.2M
  • R7 = 100K
  • R8 = 22K
  • R9 = 6.8K
  • R10 = 100K
  • Q1 = BC550C
  • Q2 = BC328
  • Q3 = BC328
  • C1 = 220nF-63V
  • C2 = 22nF-63V
  • C3 = 220nF-63V
  • C4 = 22nF-63V
  • C5 = 22nF-63V
  • C6 = 47uF-25V
  • D1 = 1N4148
  • D2 = 1N4148
  • B1 = 3V Battery
  • IC1 = 7555 CMos IC
  • RL1 = DIL Reed-Relay SPDT
  • SW1 = SPST Switch
  • MIC1 = Electret Mic
Notes: 
 A small DIL 5V reed-relay was used in spite of the 3V supply. Several devices of this type were tested and it was found that all of them were able to switch-on with a coil voltage value comprised in the 1.9 - 2.1V range. Coil resistance values varied from 140 to 250 Ohm. Stand-by current consumption of the circuit is less than 1mA. When the Relay is energized, current drain rises to about 20mA.

0 comments

Temperature-Controlled Switch

Description
It sounds rather mysterious: a switch that is controlled by its ambient temperature. All without the touch of a human hand, except for when you’re building this sort of electronic thermostat. There are a lot of handy uses for a thermally controlled switch. If the temperature inside your PC gets too high sometimes, the circuit can switch on an extra fan. You can also use to switch on an electric heater automatically if the room temperature is too low. There are innumerable potential applications for the thermostat described here.
Circuit diagram:
There are lots of ways to measure the temperature of an object. One very simple way is to use a semiconductor sensor, such as the National Semiconductor LM35 IC. This sensor is accurate to within 0.5 °C at 25 ºC, and few other sensors can do better or even come close to this level of accuracy. In the circuit described here, the sensor (IC2) generates an output voltage of 10 mV/°C, so the minimum temperature that can be measured is 0 °C. At 25 °C, the output voltage of the sensor is (25 °C × 10 mV/°C) = 0.25 V.

The circuit uses a TLC271 opamp as a comparator. It compares the voltage from the temperature sensor, which is connected to its non-inverting input (pin 3), with the voltage on its inverting input (pin 2). The latter voltage can be set with potentiometer P1. If the voltage from the sensor rises above the reference value set by P1 (which represents the desired temperature), the output of the comparator toggles to the full supply voltage level. The output is fed to transistor T1, which acts as a switch so the output can handle more current.

This makes it possible to energize a relay in order to switch a heavy load or a higher voltage. The transistor also supplies current to LED D1, which indicates whether the temperature is above the reference value. The reference value can be adjusted by P1 over the range of 18–30 °C with the indicated component values. Of course, you can adjust the range to suit your needs by modifying the value of R1 and/or R2. To prevent instability in the vicinity of the reference value, a small amount of hysteresis is provided by resistor R4 so the temperature will have to continue rising or falling by a small amount (approximately 0.5 °C) before the output state changes.

The LM35 is available in several different versions. All versions have a rated temperature range of at least 0–100 °C. One thing you may have to take into account is that the sensor has a relatively long response time. According to the datasheet, the sensor takes 3 minutes to reach nearly 100% of its final value in still air. The opamp has very low drift relative to its input voltages, and in the low-power mode used here it draws very little current. The sensor also draws very little current, so the total current consumption is less than 80 µA when LED D1 is off.

The advantage of low current consumption is that the circuit can be powered by a battery if necessary (6 V, 9 V or 12 V). The sensor has a rated operating voltage range of 4–30 V, and the TLC271 is rated for a supply voltage of 3–16 V. The circuit can thus work very well with a 12-V supply voltage, which means you can also use it for car applications (at 14.4 V). In that case, you must give additional attention to filtering out interference on the supply voltage.
0 comments

Whistle Responder Schematic - Circuit Diagram

Description
Some 20 years ago it was common to see small key-holders emitting an intermittent beep for a couple of seconds after its owner whistled. These devices contained a special purpose IC and therefore were not suited to home construction. The present circuit is designed around a general purpose hex-inverter CMos IC and, using miniature components and button clock-type batteries can be enclosed in a matchbox. It is primarily a gadget, but everyone will be able to find suitable applications.
Circuit operation
 This device beeps intermittently for about two seconds when a person in a range of around 10 meters emits a whistle. The first two inverters contained in IC1 are used as audio amplifiers. IC1A amplifies consistently the signal picked-up by the small electret-microphone and IC1B acts as a band-pass filter, its frequency being centered at about 1.8KHz. The filter is required in order to select a specific frequency, the whistle's one, stopping other frequencies that would cause undesired beeper operation. IC1C is wired as a Schmitt trigger, squaring the incoming audio signal. IC1D is a 2 second-delay monostable driving the astable formed by IC1E & IC1F. This oscillator generates a 3 to 5Hz square wave feeding Q1 and BZ1, thus providing intermittent beeper operation.
Circuit diagram:
 Parts: 
    R1 = 22K 1/4W Resistor
    R2 = 10K 1/4W Resistor
    R3 = 4M7 1/4W Resistor
    R4 = 100K 1/4W Resistors
    R5 = 220R 1/4W Resistor
    R6 = 330K 1/4W Resistor
    R7 = 47K 1/4W Resistor
    R8 = 100K 1/4W Resistors
    R9 = 2M2 1/4W Resistor
    R10 = 1M5 1/4W Resistor
    C1 = 47nF 63V Polyester or Ceramic Capacitors
    C2 = 10nF 63V Polyester Capacitors
    C3 = 10nF 63V Polyester Capacitors
    C4 = 1µF 63V Electrolytic Capacitors
    C6 = 1µF 63V Electrolytic Capacitors
    C5 = 47nF 63V Polyester or Ceramic Capacitors
    D1 = 1N4148 75V 150mA Diodes
    D2 = 1N4148 75V 150mA Diodes
    Q1 = BC337 45V 800mA NPN Transistor
    B1 = 2.8 or 3V Battery (see notes)
    IC1 = 4049 Hex Inverter IC
    BZ1 = Piezo sounder (incorporating 3KHz oscillator)
    MIC1 = Miniature electret microphone
Notes:
  • Power supply range: 2.6 to 3.6 Volts.
  • Standing current: 150µA.
  • Depending on dimensions of your box, you can choose from a wide variety of battery types:
  • 2 x 1.5 V batteries type: AA, AAA, AAAA, button clock-type, photo-camera type & others.
  • 2 x 1.4 V mercury batteries, button clock-type.
  • 1 x 3 V or 1 x 3.6 V Lithium cells. 
 Source http://www.extremecircuits.net/2009/12/whistle-responder-schematic-circuit.html
0 comments

Light Sensor Alarm circuit with NE555

Reagarding this circuit sent out an alarm when its LDR sensor is exposed to light by sun or lamp.
A 555 astable multivibrator was used here which sent signal a tone of about 1kHz upon detecting light.
The sensor when exposed by light completes the circuit and makes the 555 oscillate at about 1kHz with transistor to drive current.
The sensor is also shown in the circuit diagram. It has to placed making an angle of about 30 – 45 degrees to the ground.
 Sensitivity can be adjust with P1.
 This makes the sun light to flow through it to the ground and prevents the alarm from going on due to the stored light on the sensor.
0 comments
 
Support : Creating Website | Johny Template | Mas Template
Copyright © 2011. The Circuit - All Rights Reserved
Template Created by Creating Website Published by Mas Template
Proudly powered by Blogger